How to apply makeup on small eyes with hooded eyelids (deep-set eyes)
I’ve decided to begin a series of articles about applying makeup on different eye shapes. Coming soon: the mature eye, the small regular-shaped eye, the droopy eye, etc.
I think the most common eye shape is probably the eye whose eyelid is almost invisible because of the hooded upper lid. I see numerous clients who have this type of eye and don’t know how to apply makeup to disguise it and look their best.
Here is a no-makeup photo to show what this eyelid type looks like. You can see that he upper lid conceals most of the eyelid itself.

This eye shape can make you look tired or angry because the eyebrow is also often set low. So it’s essential, before applying eye-makeup, to pluck your brows and lighten up the area.
The other disadvantage of the hooded eyes is that it creates shadows and emphasises those dark under-eye rings. So you should acquire a good light-reflecting concealer. Here’s a good tip: walk with your head held high. This will light up your look as you’ll have fewer shadows over your eyes!
The way to success with this type of eye is to readjust the balance between the light and shadowy areas to create harmony and widen the eyes. Dark areas retreat and light areas stand out. Consequently, to correct the hollow lid, we have to apply a light shadow and to reduce the volume of the droopy upper lid; we’ll apply a dark shadow. To widen the eyes, we’ll use eyeliner or pencil appropriately.
So here’s a step-by-step guide to get that perfect look!
Step 1) Basic Eye shadow (light shade eyeshadow)

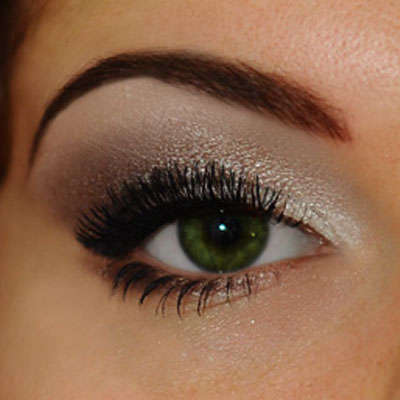
Begin by applying a light ivory, beige or white eye shadow. Ideally, it should be pearly but if you have wrinkles or fine lines, choose a satiny or velvet shadow. Apply the shadow over the whole eyelid, from the lashes to the eyebrow but you can also apply it only on the brow bone and the lower eyelid.
Step 2) Dark eye shadow


For this look, I used a dark plum shadow, to bring out our model’s green eyes, but you could use almost any color in any shade. It’s not absolutely necessary to use a really dark shadow. You could use a medium tone like a bronze, brown or light grey or any other color, provided there is a contrast with the base color and you get the illusion of a shadowy area.
To balance out the upper eyelid, apply the dark color much higher than you would with the regular eyelid. Usually, the dark color accentuates the hollow under the brow bone (also known as the eyelid fold or crease) , so begin in the hollow, at the outer edge of the eyes, go upwards towards the domed area and go back down towards the centre of the eyelid (opposite the iris).
For this and the two following steps, I’ll show you the results on half-closed eyes, with raised eyebrows, then with the eye open, with a neutral expression. The reason for this is that most of the time you put on makeup in the first position (raised eyebrows, head thrown back, looking down.) To make things easier, I’ll call this the “makeup position”. This pose allows you to see the whole eyelid, without a crease. The disadvantage, especially for those with droopy lids, is that when you come back to a normal position (neutral expression), you realise that the effect produced doesn’t look like you imagined it. So it’s very important, at each stage, to constantly come back to a neutral expression so that you can see where you’re going and avoid the dreaded droopy effect.
When you’re in « makeup position », with dark shadow, there’s a tendency not to apply it high enough. In this case, when you come back to your normal expression, you can’t see the eye shadow because it’s hidden in the hollow.
The best way to do this is to use a fairly large, round brush, with soft bristles. Use a back and forth movement to make an arc shape and that’ll do the trick!
Step 3) Highlighter


Highlighting eye shadow is ideal to bring out hollow areas, because it has light-reflecting pigments. It can be any light colour but for the photo, I used a pearly white.
Apply the highlighter from the inner corner to about ¾ of the way across the lid to where it meets the dark shadow. Usually, you should stop at the eyelid crease but you could, if you wish, extend it upwards a little to create the illusion of a larger eyelid. You could also apply a small amount of highlighter just under the inner corner of the eye to get a more luminous look.
Step 4) Eyeliner


You can use any type of eyeliner, liquid, cream, cake or pencil in any colour.
Here are two important rules:
1. When you have small eyes, you should end the line in the middle of the eye, opposite the iris. Start with a wider line at the outer corner, thinning it down towards the middle so as not to end the line abruptly. If you find this difficult, use a Q-tip soaked in eye makeup remover and wipe it lightly over the end of the line to create a softer look.
2. When you have droopy upper lids, you should apply your eyeliner with a neutral expression so that the little curl of liner at the outer corner of the eye is at the right height. (Of course, you don’t need to extend the line beyond the outer corner if you don’t want to, you can stop at the end of the eye.) So make one or two guide marks with you eye open normally, and then fill in the line in “makeup position”.


It’s a common mistake (see preceding photos for reference) to line the eye straight away in « makeup position », because when you come back to a normal position, the line will point downwards, following the droopy lid. This should be avoided at all costs unless you want to accentuate the droopy effect! If you look at the first eyeliner photo in step 4, with the eye half-closed, you’ll see that the eyeliner curls upwards. You might think you’ll end up with this rather weird look but no: when you come back to a neutral expression, the eyeliner will be at exactly the right level.
Step 5) Define the under-eye area

Still with the aim of making the eye look bigger and more defined, you could apply a fine line using liquid liner or pencil close to the lashes, from the outer corner to a point in the centre, opposite the iris. Or you could opt for the « almond eye ». To see this technique, click on the link.
For this look, I used the same dark plum eye shadow that I used in step 2. I applied it dry, close to the lower lashes, with an eyeliner brush. This gives a softer, more natural look. I also extended the line outwards a little to flatter the shape of the model’s eye.
Steps 6 and 7) Mascara and eyebrows

Mascara is a must, because it brightens the look and really opens up the eye. For droopy eyes, I recommend curling, lengthening mascara. But for the photo, I used volumizing mascara because I didn’t want the lashes to be so long that they would hide the eye shadow.
You should also curl your lashes with an eyelash-curler. This is an essential step because it really opens up the eye.
You can also apply mascara to the lower lashes since this will help to make the eye look even bigger.
Unless your eyebrows are already very thick, heavy or dark, eyebrow makeup is essential to add punch to your look and frame the face. It’s that little extra “je-ne-sais-quoi” that makes all the difference!
** By popular demand, here are the products I used:
-Light shadow (base): Lancôme Color Design Filigree
-Dark plum shadow: Lancôme Color Design Backstage Pass
-Pearly white shadow: Benefit Lust Duster Snow Bunny
-Black liquid eyeliner: Almay Liquid Liner Black
-Mascara : Cover Girl Lash Blast Very Black
-Brows: Smashbox Brow Tech Brunette