How to correct your face shape with blush and bronzing powder
No face is perfect. We are born with our face and we have to live with it. Well, maybe not. Makeup can help us. Blush and a few simple techniques can correct a face that is too long, too round or too square; it can create the illusion of a perfect oval. Here are a few graphics which show you the right way to apply blush on your cheeks according to each face shape, as well as how to create hollows with a dark shade such as a bronzing powder.
Obviously, the pictures show blush and the hollows it creates in a rather exaggerated way so as to show you the right areas to apply it, but if you use these techniques on a real face, go gradually and blend, blend, blend. It’s important to do this in daylight, so that it looks natural. If you find it difficult to use a brush and a powder blush, you could try a crème blush. It’s easy to use as it blends easily into the skin and you can use your fingers.
If you have an oval face

You’re so lucky! The oval face is ideal for makeup; it’s the one that is used as a base for correcting all other face shapes.
In fact, it’s the perfect shape. The oval face is easy to recognize because it has no unharmonious features. It’s perfectly balanced; forehead and chin are the right length, prominent cheekbones, and regular, well-rounded features. Everything is in the right place. But that doesn’t mean you shouldn’t try to highlight it!

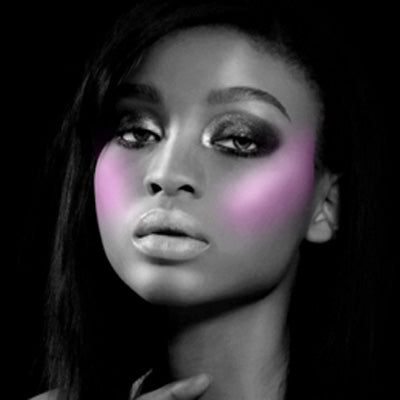
The above graphic shows where to apply blush to accentuate the oval shape. In fact, you should start with the apple of the cheek and extend the blush outwards and upwards towards the temple. Here’s a tip: think of the Nike logo that looks like a check mark.
![]()
If you have a long face

To see whether you have a long face, first of all look at your chin, which is probably longer than average. The jaw line is less pronounced, the face is slim, and the forehead and nose are long too.

So the aim is to separate the face in two and create a perpendicular line which will lead the eye towards the sides of the face. The blush should therefore be applied horizontally, to contrast with the vertical line of the long face.

When using dark shades, again the goal is to separate the face in two by creating hollows beneath the cheekbones. So apply a bronzing powder or any other matte blush darker than your natural complexion directly below the cheekbone. Then correct the long shape by creating shadows at the extremities of the face: top of the forehead and base of the chin.
If you have a square face

The square face is easy to recognize because it is strong and angular. Obviously the jaw line, the bones of the forehead and chin are more pronounced. Contrary to the long face, the square face is too horizontal. So we must create vertical lines. Also we must go for rounded, curved shapes; this will soften the line of the face.

So the blush should be applied with the « healthy glow » technique. You should smile and then apply the blush in the centre of your cheekbone with a circular motion.

Now create shadows on the most angular areas like the jaw line, the two points of the square chin, the sides of the forehead or above the eyebrows if the brow bone is very prominent.
If you have a round face

A round face is the opposite of a square one. It has curvy, rounded shapes. In fact, the curves of the cheeks and the lower part of the face hide the jaw line and the cheekbone, making them invisible. So the round face should be corrected with more structure and length. Try to create vertical lines because the round face is often wider.

You should apply the blush diagonally, at a 45 degree angle, on the cheekbones; this gives a lot of definition.

Then create a false hollow with bronzing powder under the cheekbone which you can accentuate by making a big O with your mouth, pushing the chin lower. The hollow will also have a diagonal shape but will continue downwards to create a wide horizontal filled-in v-shape (don’t leave a space between the cheekbone and the chin). If you don’t wear a hairstyle with bangs, you can also shade the sides of the forehead lightly to leave a lighter zone in the centre. This creates a vertical line from the top of the forehead to the base of the chin.