In my series of articles on makeup for different eye shapes, I had completely forgotten the hollow eye. A short time ago, a reader sent me her photo and told me she couldn’t really decide what shape her eyes were. At first, I said she maybe had rather protruding eyes but not that much. The technique for making up protruding eyes could suit her but something was missing. I wondered how I could help her and straightaway I realised that I had to correct her hollow eyes. During my career, I have met people with this problem and it’s impossible to use traditional techniques such as illuminating the mobile lid and applying darker shadow in the crease because in this case, you’ll only make the problem worse. You have to use a technique which is specifically designed for this type of eye.
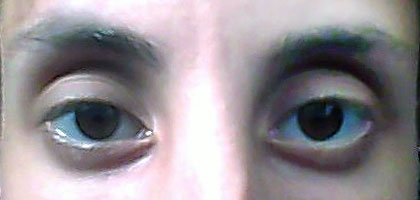
My reader has kindly allowed me to use her photo for my tutorial so here it is.
Step 1: Pluck the eyebrows

Hollow eyelids create shadows so it’s essential to avoid other sources of shadow such as the eyebrows for example. The higher and thinner the eyebrows, the less obvious the darkness of the eyelid. The goal is to brighten up the eye.
Step 2: Apply concealer

Protruding eyes often have a shadow directly underneath which increases the hollow look and you have to use concealer for this. With hollow eyes, apply the concealer not only under the eye but all around it, up to the eyebrows, including all the surface of the lid. This step makes a big difference in diminishing the shadowy areas. Use an illuminating concealer with good coverage.
Step 3: Apply medium to dark eye shadow

Normally, you’d apply a light colour on the mobile lid and a dark colour in the crease but this would amplify the hollow-eyed look. So you have to do the opposite. The smoky eye technique is good if you want a more intense look. In this case, I prefer a medium to dark shadow applied only on the mobile lid; don’t go as far as the crease.
Step 4: Apply light-coloured eye shadow

In this case, the light colour should be applied in the crease and up to the eyebrows. You can also apply a little on the inner corner of the eye if this area looks too dark.
Step 5: Structure the look with a dark shadow

This step is optional. It depends on the shape of your eye. For my reader, I chose a darker shade, to be applied in the corner, but not in the usual way. I take it up higher than the actual crease to create the illusion that the crease is not in the same place, I stretch it to the outside a little to create an almond-shape and reduce the roundness cause by the shadowy areas. Then I take it down a little underneath the eye but only at the outer corner.
Step 6: Apply eyeliner and kohl pencil

To reduce the protruding aspect, eyeliner should be applied only on the outer third of the lash line. Don’t use it on the inner corner and only on the upper lash line. I like to extend it outward to accentuate the almond effect and reduce roundness. But this is optional. To intensify the look and to give an extra boost to the bulge-reducing effect, apply black kohl on the inner lid too.
Step 7: Apply mascara

Mascara accentuates the eye contour in the right places meaning that the dark hollow-eyed look is diminished. It really opens up the eye.
Step 8: Eyebrow makeup

Another optional step but I’m a big fan of eyebrow makeup. The eyebrows really structure the face. And in this case, it does the same job as the mascara; it distracts attention from the hollow lids, opening up the eye.
Before-After
Here’s the result so you can really see the difference